Relays Buttons and Physical Layout
Objective
- To better understand the buttons and physical layout of Relay Devices
Environment / Applies To
- Relay Devices
- All Relay Service Plans
Overview
- Relay+, RelayM, and RelayX devices have similar functionality with some differences between models. Let's get to know your Relays.
Relay+
- TALK: Press and hold to speak with other Relays. Release the button when you are finished.
- Note: There are a series of LED lights around the talk button, for more information about what these lights mean, reference this article.
- RELAY ASSISTANT: Press and hold to use the Relay Assistant. Quick tap to cycle through the enabled channels on the Relay.
- VOLUME UP (+): Hold Volume Up for 5 seconds to power on the device. Hold again for 5 seconds to power off. Press Volume Up to increase the volume.
- VOLUME DOWN (-): Press Volume Down to decrease the volume. Hold Volume Down for 5-10 seconds to restart the device.
RelayX & RelayM
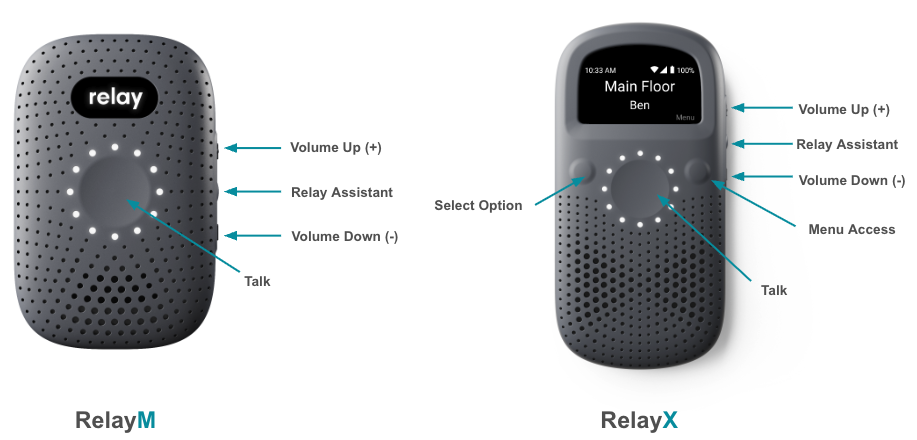
- TALK: Press and hold to speak with other Relays. Release the button when you are finished.
- Note: There are a series of LED lights around the talk button, for more information about what these lights mean, reference this article.
- RELAY ASSISTANT: Press and hold to use the Relay Assistant. Quick tap to cycle through the enabled channels on the Relay.
- VOLUME UP (+): Hold Volume Up for 5 seconds to power on the device. Hold again for 5 seconds to power off. Press Volume Up to increase the volume.
- VOLUME DOWN (-): Press Volume Down to decrease the volume. Hold Volume Down for 5-10 seconds to restart the device.
- Push to Talk (PTT): Press and hold the center button to talk, keeping the device 6-8 inches away from your mouth for best audio clarity.
- LEFT Navigation Button (RelayX): Left allows you to move through menu options.
- RIGHT Navigation Button (RelayX): Right lets you select what is on the screen.
Additional Notes
- For information on how to use a Relay Device, reference this article
- For information on Relay Assistant Commands, reference this article
Related Articles
How to Enable the Summon Command for Relays
Objective Enable the summon command in Relay Dash for use with your Relays Environment/Applies To Dash Owners/Admins Relay Devices Procedure Log into Dash at dash.relaypro.com Under Account click Teams If you want to enable the Summon Command for all ...
How to Connect a Bluetooth Headset to a Relay
Objective Understanding how to connect a Bluetooth headset to Relay+, RelayM and RelayX Environment / Applies To Relay Devices Relay Dash Relay App Procedure Relays have the ability to add a Bluetooth headset through Dash, the Relay app or the Relay ...
How to End a Call on a Relay
Objective End a direct call from a Relay device Environment/Applies To Relay device Procedure Calls automatically end after 10 seconds of inactivity from either user. There is no action needed to end calls. Additional Information For information on ...
How to Rename a Relay or User in Dash
Objective To better understand how to rename Users and Devices in Dash individually and in bulk Environment / Applies To Relay Dash Relay Virtual Users with Edit Permissions Procedure Renaming a Relay or user in Dash is a simple process that can help ...
How to Set Up a Geofence
Objective To better understand how to set up a Geofence in Relay Dash. Environment / Applies To All Relay Service Plans Dash Procedure Geofences are a great way to keep track of where your Relays are going. With Goefences, you will be able to see ...